

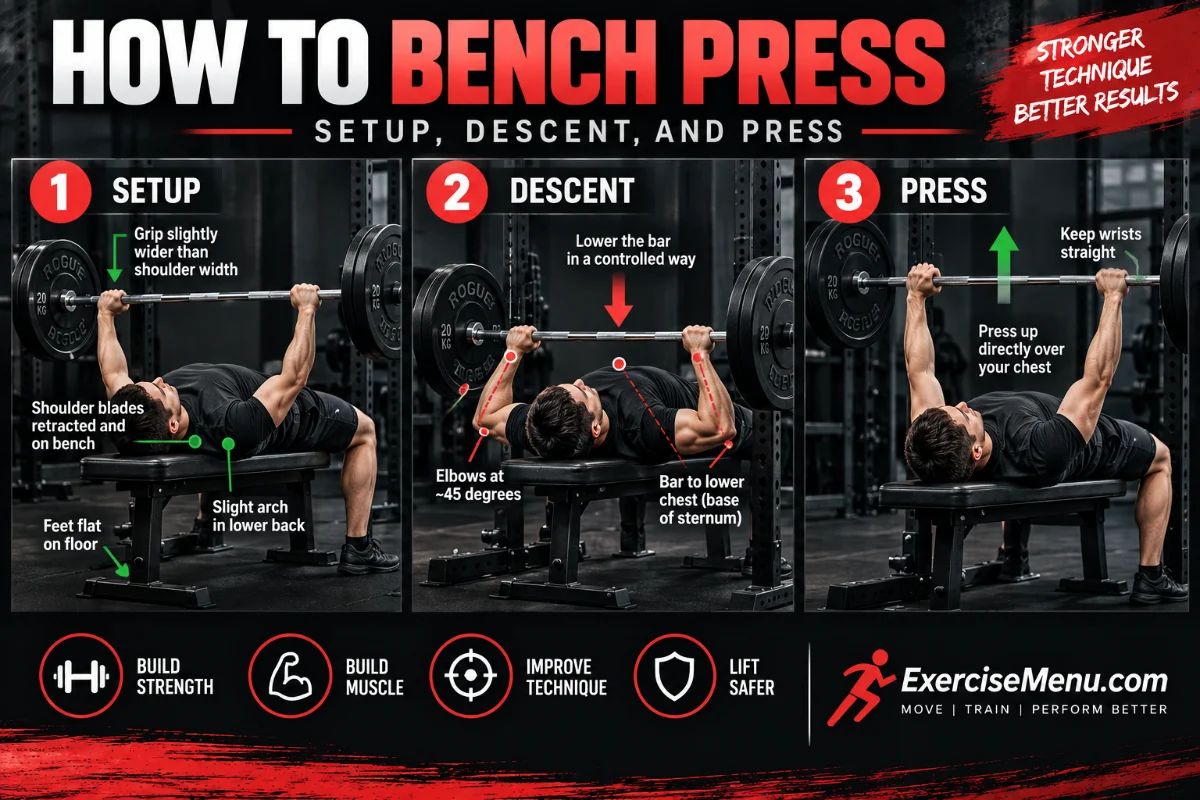
Quick Answer: Lie on a flat bench with your eyes under the bar. Retract your shoulder blades, grip the bar at roughly 1.5 times shoulder width, plant your feet, and take a deep breath. Unrack with locked elbows. Lower the bar to your lower sternum with elbows at 45 degrees. Press up and slightly back to lockout. Repeat.
The bench press is the most commonly tested upper body exercise in strength training. It loads the chest, triceps, and front delts heavier than any other pressing movement. But “lying down and pushing a bar up” and “bench pressing well” are two different things, and the gap between them is almost entirely setup.
The difference comes down to preparation. If your shoulder blades are loose, your feet are floating, or the bar is in the wrong part of your hand, the press itself will always feel harder and less stable than it should.
- Muscles the Bench Press Works
- How to Set Up on the Bench?
- How to Unrack the Bar?
- How to Lower the Bar?
- How to Press the Bar Up?
- How to Breathe During the Bench Press?
- Before Every Set: A 5-Point Checklist
- Common Bench Press Mistakes
- When to Add Weight and How to Progress?
- If Your Shoulders Hurt During Bench Press?
- Frequently Asked Questions
- Your Next Step
Muscles the Bench Press Works
| Role | Muscles |
|---|---|
| Primary movers | Pectoralis major (chest), triceps brachii, anterior deltoid |
| Stabilizers | Latissimus dorsi, serratus anterior, rotator cuff, core |
A 2017 systematic review by Stastny et al. published in PLOS ONE analyzed 14 EMG studies and found that the pectoralis major and triceps brachii have similar activation levels during the bench press, both significantly higher than the anterior deltoid. The chest and triceps share the pressing load roughly equally, with the front delts contributing less than most people assume.
The lats and serratus anterior stabilize the shoulder blade position throughout the press. If these stabilizers are weak or inactive, the shoulder blades drift apart under load, which is why the setup matters as much as the press itself.
How to Set Up on the Bench?
The setup happens before you touch the bar. Every point below locks in before you unrack.
1. Position your body. Lie on the bench with your eyes directly under the bar. This gives you enough clearance to unrack without the bar hitting the hooks on the way up, and keeps the bar path clear during the set.
2. Plant your feet. Place your feet flat on the floor, pulled back toward your hips as far as you can while keeping them flat. Press your feet actively into the ground. This is where leg drive originates, and it starts before you unrack.
3. Retract your shoulder blades. Squeeze your shoulder blades together and pull them down, as if tucking them into your back pockets. This creates a stable shelf for the shoulder joint and lifts the chest. Hold this position for the entire set. The moment the blades loosen, the set is effectively over.
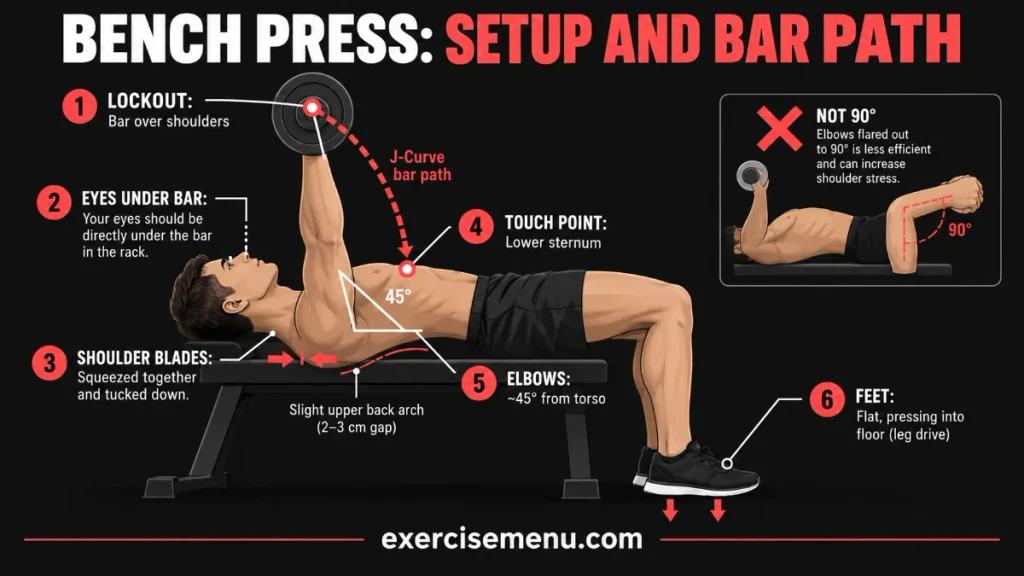
4. Set your arch. With your blades retracted, drive your upper back into the bench. Your chest should rise 2 to 3 centimeters above the plane of your shoulders. This is a thoracic arch, not a lower-back hyperextension. Your ribcage points toward the ceiling while your glutes stay on the bench.
5. Grip the bar. Place the bar in the base of your palm, not high near the fingers. Wrap your thumbs around the bar (never use a thumbless grip with heavy weight). For hand placement, position your hands so your forearms are roughly perpendicular to the floor at the bottom of the press. For most people, this is about 1.4 to 1.5 times shoulder width. The grip width guide covers how to find your exact position and how narrow vs wide grips change the muscle emphasis.
How to Unrack the Bar?
Unracking incorrectly is one of the fastest ways to lose the setup you just built.
Press the bar straight up off the hooks by extending your elbows. Do not pull the bar forward off the hooks, because the pulling motion rounds the shoulders forward and releases the scapula retraction you set. The bar should finish directly over your shoulder joints with elbows locked, not over your face or your chest.
Hold that position for one second. Confirm that your shoulder blades still feel tight, your feet are still pressed into the floor, and the bar feels stable. Then begin the descent.
On heavy sets, use a spotter for the liftoff. Having someone assist the unrack lets you maintain full scapula retraction without fighting the weight off the hooks.
How to Lower the Bar?
Lower the bar to your lower sternum, roughly where the sternum meets the upper abdomen. Not the upper chest, not the neck, not the nipple line. A lower touch point keeps the elbows naturally tucked at about 45 degrees from the torso, which balances pec activation with shoulder safety.
The bar path is not straight down. It follows a slight diagonal from above the shoulders (at lockout) to the lower chest (at the bottom). This diagonal is sometimes called the J-curve, and it happens naturally when the touch point and elbow angle are correct.
Lower the bar at a controlled pace. You do not need a slow eccentric here. Save energy for the press. The descent should be smooth and deliberate, not a free fall and not a 4-second crawl. Touch the chest lightly without bouncing. The bar makes contact and immediately reverses direction.
Martínez-Cava et al. (2022) found in the Journal of Strength and Conditioning Research that full range of motion bench press produced greater neuromuscular adaptations than partial reps. Cutting the rep short above the chest reduces the training stimulus. Touch the chest on every rep.
How to Press the Bar Up?
Press the bar up and slightly back toward the rack, not straight up. The bar finishes directly over the shoulder joint, which is behind where it touched your chest. That backward angle is the reverse of the J-curve on the descent.
As you press, drive your feet into the floor. This is leg drive: your legs push against the ground, which drives your upper back harder into the bench, which gives your pressing muscles a more stable base to push from. The force doesn’t come from your legs directly. It comes from the stability they create.
Keep your shoulder blades pinched throughout the press. If you feel them sliding apart as you push, the weight is too heavy for your stabilizers at that rep count.
Lock your elbows fully at the top. Stopping short of lockout keeps the muscles under tension but removes the brief rest point that lets you reset your breath between reps. Full lockout on each rep is standard technique.
The most useful mental cue: “Push yourself into the bench” rather than “push the bar away from you.” This shifts your focus toward maintaining back tightness and foot drive, which prevents the shoulder blades from releasing.
How to Breathe During the Bench Press?
Take a big breath at the top before each rep. Hold it as you lower the bar and through the initial press. Exhale at or near lockout. Breathe again at the top before the next rep.
Holding your breath during the rep is called the Valsalva maneuver. It creates intra-abdominal pressure that stabilizes your torso and keeps your upper back position locked. Breathing out during the descent or at the bottom collapses the pressure and loosens the entire setup.
For sets of 5 or fewer reps, one breath per rep is standard. For higher rep sets (8 to 12), you may need to take two quick breaths at the top between reps to avoid lightheadedness. Never hold your breath for multiple reps consecutively.
Before Every Set: A 5-Point Checklist
Use this before every working set. It takes 10 seconds and catches setup errors before they cost you a rep.
| Check | Cue |
|---|---|
| 1. Feet | Flat, pulled back, pressed into floor |
| 2. Shoulder blades | Squeezed together, tucked down |
| 3. Chest | Lifted, slight upper back arch |
| 4. Grip | Bar in base of palm, forearms vertical at bottom |
| 5. Breath | Big breath, hold, unrack with locked elbows |
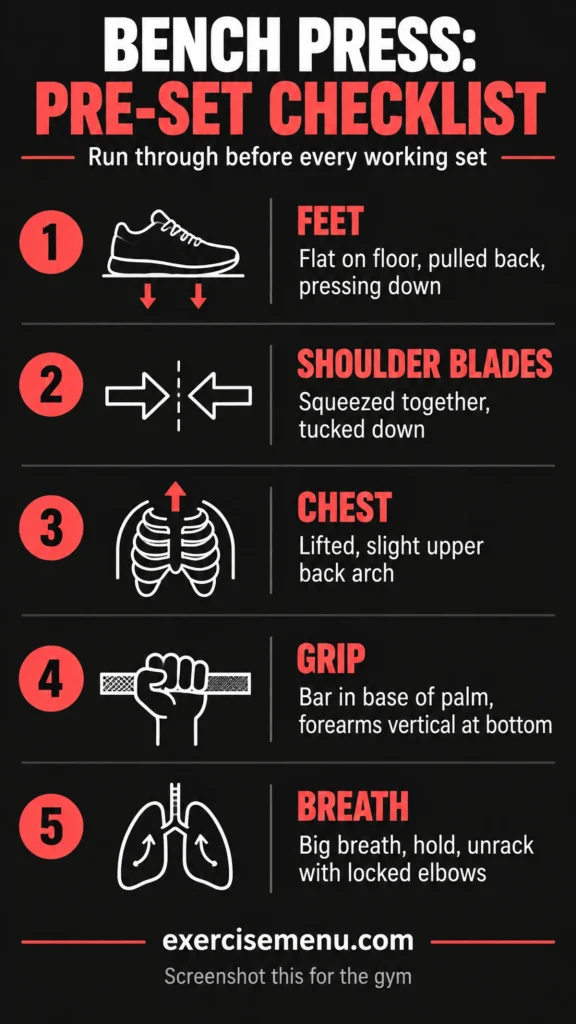
If any of the five feel off after unracking, rerack and reset. Pressing from a bad setup reinforces bad mechanics.
Common Bench Press Mistakes
| Mistake | What It Costs You |
|---|---|
| Bouncing bar off chest | Removes the eccentric-to-concentric transition, reduces muscle stimulus, risks sternum injury |
| Lifting butt off bench | Loses the stable base leg drive creates, shortens range of motion |
| Flaring elbows to 90° | Shifts stress to front of shoulder, increases injury risk over time |
| Pressing to neck or face | Dangerous bar path, overloads front delts instead of chest |
| Uneven grip | Loads one shoulder more than the other, creates asymmetric wear |
| No spotter on heavy sets | No safety net for failed reps when benching alone (use safety pins in a power rack if no spotter) |
When to Add Weight and How to Progress?
Progressive overload drives bench press improvement. For beginners, add 1 to 2.5 kg per session. When load increases stall, add one rep per set per week until you can hit the top of your target rep range, then increase weight and drop reps back down.
Test your 1RM every 8 to 12 weeks to track long-term progress. Compare your number to bench press standards by bodyweight and experience level to see where you stand.
Bench press progress is slower than squat or deadlift progress because the muscles involved are smaller. Adding 2.5 kg per session for 3 months straight is realistic for a beginner. After the first year, monthly increases become more common than weekly ones. Patience here is not optional.
If Your Shoulders Hurt During Bench Press?
Shoulder discomfort during bench press usually comes from specific form errors in the setup, not the exercise itself. Losing scapula retraction, flaring elbows too wide, pressing with a flat back, or touching the bar too high on the chest each place stress on the front of the shoulder joint.
The full breakdown of which form errors cause shoulder stress and how to fix each one covers this in detail, including the research on which technique positions produce the lowest shoulder joint forces.
Frequently Asked Questions
Should beginners use a Smith machine to learn bench press?
A Smith machine removes the stabilization demand, which means the stabilizer muscles (lats, serratus, rotator cuff) never learn to work during the press. Start with an empty barbell on a flat bench inside a power rack with safety pins set just below chest height. The free barbell teaches stabilization from day one, and the safety pins catch failed reps.
Is arching your back on bench press safe?
Yes. A slight thoracic arch is part of standard bench press setup at every level, from recreational training to competitive powerlifting. The concern usually comes from seeing exaggerated competition arches, which are a different technique used to shorten range of motion for heavier loads. A moderate arch for general training creates a shoulder position that reduces joint stress, and it does not place meaningful load on the lumbar spine.
Do I need a spotter for bench press?
For sets near your max (RPE 8 or higher), yes. A spotter prevents the bar from pinning you if a rep fails. If you train alone, bench inside a power rack with safety pins set one to two centimeters below your chest height. The pins catch the bar without interfering with your range of motion during successful reps.
How many times per week should I bench press?
Two sessions per week is the most common effective frequency for intermediate lifters. One heavier session (3 to 5 reps) and one moderate session (8 to 12 reps) provides both strength and hypertrophy stimulus while allowing recovery between sessions. Beginners can start with two sessions and progress to three once they adapt.
What weight should a beginner start with on bench press?
The empty barbell (20 kg / 45 lbs). If the empty bar is too heavy, start with dumbbells at a weight you can control for 3 sets of 10 with good form. The goal in the first two to four weeks is movement quality, not load. Add weight only once the setup and bar path are consistent on every rep.
Your Next Step
Film one set from the side. Run through the 5-point checklist before you unrack. Check three things on the video: are your shoulder blades still squeezed at the bottom of each rep, are your elbows at roughly 45 degrees, and does the bar touch your lower chest? Fix the first error you see, give it two sessions, and film again. Improvement compounds faster when you can see what you’re correcting.
For the warm-up that should come before your first bench set, the warm-up guide covers the full 3-phase protocol including shoulder-specific activation exercises.
