

Quick Answer: Stand with the bar over your mid-foot, grip just outside your legs, bend your knees until your shins touch the bar, set your back flat, brace your core, then push the floor away to stand. Keep the bar against your legs throughout. Lower under control and reset before your next rep.
- Key Takeaways
- Is the Deadlift Safe for Beginners?
- What Muscles Does the Deadlift Work?
- How to Deadlift: Step-by-Step
- How Much Weight Should Beginners Start With?
- What Mistakes Should You Avoid?
- How to Warm Up Before Deadlifting?
- How Often Should Beginners Deadlift?
- What Equipment Do Beginners Actually Need?
- Deadlift Variations to Try Next
- Frequently Asked Questions
Key Takeaways
- Deadlifts are safe for beginners — most injuries come from too much weight too soon, not from the exercise itself
- You should feel this lift in your glutes, hamstrings, and legs — if you feel it mainly in your lower back, the bar is drifting away from your body or your back is rounding
- Start with the empty barbell (45 lb / 20 kg) or lighter — learning the movement pattern matters more than the weight on the bar in your first weeks
- The deadlift is a push, not a pull — driving your feet into the floor engages your legs first and keeps the load off your lower back
- EMG research confirms the conventional deadlift produces greater rectus femoris and gluteus maximus activation than the Romanian deadlift — it genuinely trains the whole posterior chain from the first rep (Lee et al., 2018)
The deadlift has a reputation for being complicated and risky. It is neither — but only if you learn the setup correctly from the start. Most beginners who struggle with it are making one of four specific errors, all of which are fixable within a single session once you know what to look for.
This guide covers the exact steps, the mistakes that cause lower back pain, how much weight to start with, and how to build from your first rep to your first real working set.
Is the Deadlift Safe for Beginners?
Yes — when loaded sensibly and performed with a neutral spine. The deadlift’s reputation for causing back injuries comes almost entirely from two situations: rounding the lower back under heavy load, or adding weight faster than technique allows. Neither is unique to the deadlift, and both are avoidable.
Spine biomechanist Stuart McGill, PhD, describes the trunk muscles as “rigging” around the spine, the stronger they become, the more load the spine can bear safely. The deadlift is one of the most direct ways to develop that trunk strength, because it demands full-body bracing against a dead weight on every single rep.
Lifters who deadlift consistently tend to report fewer back problems over time, not more. Kinematic research by Escamilla et al. (2000) confirms the conventional deadlift produces significant hip extensor and knee extensor torque simultaneously — making it one of the few exercises that loads the full lower-body chain in a single movement.
If you have an existing lower back condition or are returning from injury, get clearance from a physiotherapist before loading this movement. For everyone else: start light, learn the setup, and the risk stays low.
What Muscles Does the Deadlift Work?
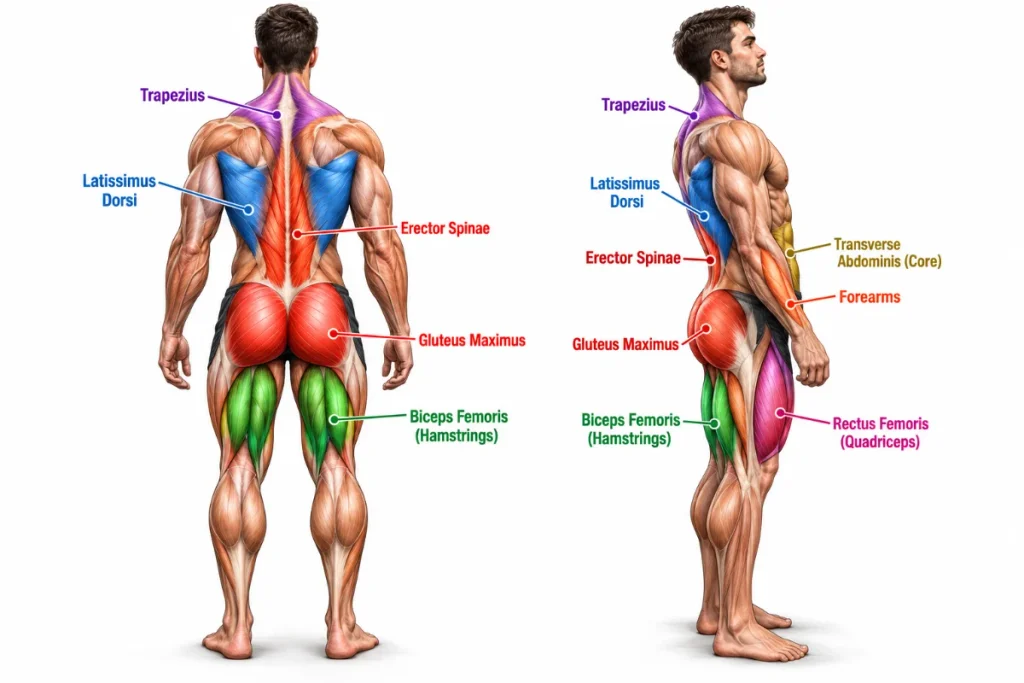
The conventional deadlift is a full-body compound movement, but the load is not distributed evenly. Your legs and hips generate the force; your back and core hold position against it.
Primary Muscles
- Glutes (gluteus maximus) — Drive hip extension from the floor to lockout. A 2018 EMG study by Lee et al. found gluteus maximus activation at 51.52% peak during the conventional deadlift — greater than during the Romanian deadlift.
- Quadriceps (rectus femoris) — Extend the knee to break the bar off the floor. The same study recorded rectus femoris at 58.57% peak — the highest of any muscle measured, confirming the deadlift is as much a leg exercise as a back exercise.
- Hamstrings (biceps femoris) — Work alongside the glutes in hip extension throughout the pull and during the controlled descent.
- Erector spinae — Hold the spine in a neutral position isometrically. They stabilise; they do not move the load.
Secondary Muscles
- Lats (latissimus dorsi) — Keep the bar close to the body and stabilise the shoulder girdle
- Trapezius — Hold the shoulders in position against the downward pull of the bar
- Core (transverse abdominis, obliques) — Brace against spinal flexion throughout every rep
- Forearms and grip — Hold the load for the duration of each set
| Muscle | Role | When It Works Hardest |
|---|---|---|
| Glutes | Hip extension | Floor to lockout |
| Quadriceps | Knee extension | Breaking bar off floor |
| Hamstrings | Hip extension + descent control | Throughout |
| Erectors | Spinal stabilisation (isometric) | Throughout |
| Lats | Bar path control | Setup through lockout |
| Core | Trunk bracing | Throughout |
| Forearms | Grip | Throughout |
Feel check: You should feel the lift in your glutes and the back of your legs. If you feel it mainly across your lower back, the bar is drifting too far from your body or your back is rounding under load — both are covered in the mistakes section below.
How to Deadlift: Step-by-Step
Quick Hip Check Before You Load Up
Stand with feet hip-width apart and push your hips straight back while keeping your shins nearly vertical. If your lower back rounds before your hands reach knee height, your hip mobility needs work before adding significant load.
Two options: use 10 lb plates instead of 45s to reduce range of motion, or start with the trap bar deadlift, its centered load allows a more upright torso and demands less hip mobility. Most beginners can pull conventional from day one; this check just tells you if modifications help.
Phase 1: Setup
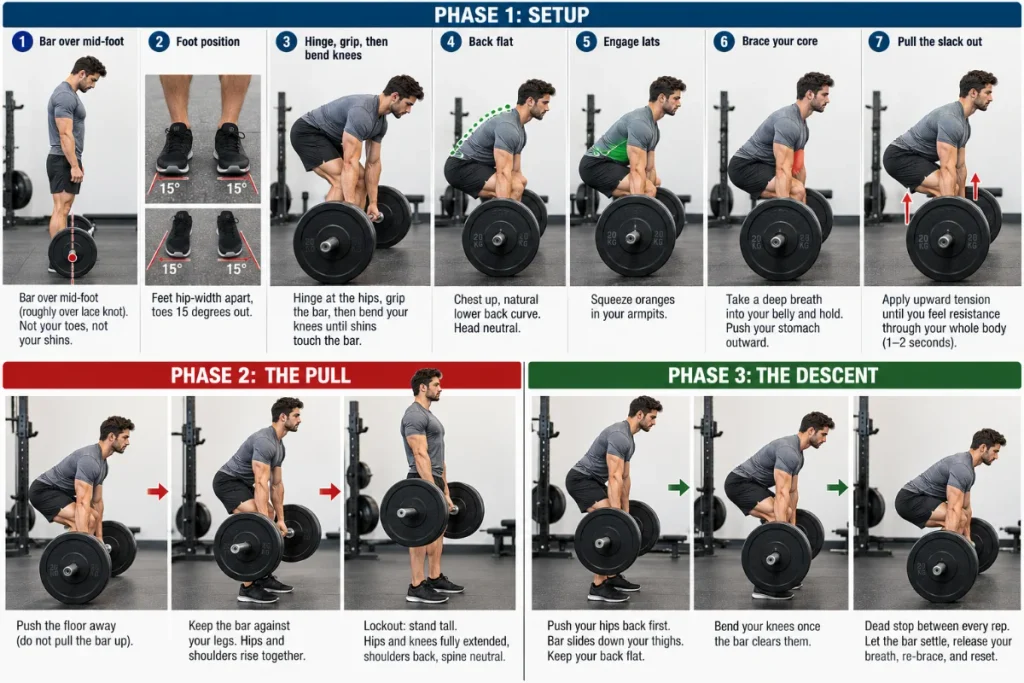
- Stand with the bar over your mid-foot. Not your toes, not your shins — the middle of your whole foot. The bar should sit roughly over the lace knot of your shoe. Your shins should not be touching the bar yet.
- Feet hip-width apart, toes turned 15 degrees out. Hip-width means roughly the distance between your hip bones — narrower than a squat stance. The toe angle helps push your knees out during the pull.
- Hinge at the hips, grip the bar, then bend your knees. This order matters. Bend forward at the hips with relatively straight legs, grip just outside your legs, then bend your knees until your shins touch the bar. Think of it as: reach down for the bar, then sit your hips toward it until your shins make contact. This keeps the bar over your mid-foot. If you squat down first, the bar shifts forward.
- Set your back flat. Raise your chest until your lower back has a natural inward curve — not rounded, not hyperextended. Your spine should look the same as it does when you stand. Head neutral: pick a point on the floor 5–6 feet ahead.
- Engage your lats. Think “squeeze oranges in your armpits.” This pulls the bar into your legs and stops it drifting forward during the pull.
- Brace your core. Take a deep breath into your belly — not your chest — and hold it. Push your stomach outward. This intra-abdominal pressure is your spine’s natural support system throughout the lift.
- Pull the slack out. Before the bar moves, apply upward tension until you feel resistance through your whole body — legs loaded, lats tight, back set. This takes 1–2 seconds. Skipping this is how the bar jerks off the floor and the lower back absorbs a sudden load spike.
Phase 2: The Pull
- Push the floor away — do not pull the bar up. Pulling with your back causes your hips to rise first. Pushing the floor down keeps your legs in the movement and your hips and shoulders rising together. Imagine pressing the earth away from the bar through your heels.
- Keep the bar against your legs throughout. The bar drags along your shins and thighs from floor to lockout. Any gap between the bar and your body increases the demand on your lower back. Wear long socks or training pants to protect your shins.
- Hips and shoulders must rise at the same rate. If your hips shoot up while your shoulders stay low, your legs have dropped out of the movement and your lower back is carrying the load alone. If this keeps happening, reduce the weight.
- Lockout: stand tall. Hips and knees fully extended, shoulders back, spine neutral. That is the finish. Do not lean back, do not shrug, do not hyperextend your lumbar. Stand straight, hold for one second, then lower.
Phase 3: The Descent
- Push your hips back first. Reverse the pull: hips back, bar slides down your thighs. Keep your back flat throughout.
- Bend your knees once the bar clears them. Not before — bending early brings your knees into the bar’s path.
- Dead stop between every rep. Let the bar settle fully on the floor. Release your breath, re-brace, reset your position, then pull again. Touch-and-go reps use momentum to skip the hardest part of the lift — the static pull from a dead weight. Dead stop reps build genuine strength and reinforce correct position on every single rep. Touch-and-go is a technique for later, not a shortcut for now.
How Much Weight Should Beginners Start With?
Start with the empty barbell — 45 lb (20 kg). If that feels heavy or your form breaks at any point, use a lighter training bar (many gyms carry 35 lb or 25 lb options) or load 10 lb plates instead of 45s. The plate diameter keeps the bar at the correct height off the floor; only the total load changes.
Women and lighter lifters: the same rule applies. There is no minimum weight that makes the lift “count.” The movement pattern is what you are training in the first few weeks — not the numbers.
When to Add Weight
Add weight when you can complete every rep of every set with a flat back, bar against the legs, hips and shoulders rising together, and a controlled descent to a dead stop. If any of those break, the weight stays put. The fastest path to a heavy deadlift is refusing to trade form for load in the first 4–8 weeks.
| Timeframe | Suggested Load | Focus |
|---|---|---|
| Week 1–2 | Empty bar or 50–65 lb / 22–30 kg | Movement pattern only — perfect every rep |
| Week 3–4 | Add 5–10 lb / 2.5–5 kg when all reps clean | First load increases |
| Month 2 | Add 5 lb / 2.5 kg per session consistently | Progressive overload begins |
| Month 3 | Test estimated 1RM | Set a reference point for programming |
To see where your deadlift stands relative to other beginners at your bodyweight, the average deadlift weight by experience level gives you a realistic benchmark. When you’re ready to test your max safely without a true max-effort attempt, how to calculate your 1RM walks through the formula.
What Mistakes Should You Avoid?
Rounding the Lower Back
The most common beginner error, and the one behind most deadlift-related back pain. When the lumbar spine rounds under load, the erectors absorb shear force they were built to resist, not bear. Fix: raise your chest before the bar moves. If rounding still happens, the weight is too heavy. Drop it, fix the position, rebuild.
Hips Rising Before Shoulders
Hips shoot up, torso stays low, the bar barely moves. This is the “stripper deadlift” — it happens when the starting hip position is too low (squatting the deadlift) or when the legs give up mid-pull and the lower back takes over. Fix: the “push floor away” cue keeps the legs engaged. If it keeps happening, check that your hips were not set too low at setup.
Bar Drifting Forward
The moment the bar drifts even a few inches from your legs, the moment arm on your spine increases and your lower back does more work than it should. This is where most people feel the lift “in their back.” Fix: engage the lats before pulling — the “oranges in armpits” cue. The bar should graze shins and thighs from start to finish.
Squatting the Deadlift
Hips too low, shins too far forward, knees in the bar’s path. The deadlift setup resembles a partial squat but operates differently, the hips are higher and the shins are more vertical. Fix: use the Phase 1 setup sequence above in order. Grip first, then bend knees until shins contact the bar. Stop there. This automatically sets the correct hip height.
Leaning Back at Lockout
Standing up and then continuing into lumbar hyperextension puts load on the lower back at its most compressed point. Lockout means standing tall — hips and knees locked out, spine neutral. The rep is done the moment you are standing straight.
Looking Up
Craning the neck upward to see yourself in a mirror extends the cervical spine under load. Keep your gaze on the floor 5–6 feet ahead. Your head follows your spine as one unit throughout the lift.
Jerking the Bar
Yanking the bar without first pulling the slack out creates a sudden load spike the lower back absorbs in the first inch of the pull. Pulling the slack out first — building tension for 1–2 seconds before the bar moves, eliminates this entirely. The lift off the floor should be deliberate; speed comes once the bar passes the knees.
How to Warm Up Before Deadlifting?
A cold posterior chain is one of the most common causes of form breakdown in the first working set — and one of the easiest things to fix. Most beginner guides skip this entirely. The warm-up does not need to be long, but it needs to target the right muscles.
Beginner Deadlift Warm-Up (10 Minutes)
- Hip circles — 10 each direction. Opens the hip joint before loading it.
- Leg swings — 10 forward and back each leg. Activates the hamstrings and hip flexors.
- Bodyweight good mornings — 2 sets of 10. Hands behind head, hinge at hips with a flat back. Teaches the hip hinge pattern without load and warms the erectors.
- Barbell warm-up sets — Always begin with the empty bar regardless of working weight. Then: 50% of working weight × 5, 70% × 3, then your first working set. These are technique sets, not cardio. Move through them deliberately and use each one to check your position before the weight becomes demanding.
How Often Should Beginners Deadlift?
Once or twice per week is the right starting frequency. Heavy deadlifts place significant demand on the central nervous system — not just the muscles — and require 48–72 hours of recovery between sessions. Training them three or four times a week before your body adapts will stall progress faster than drive it.
| Goal | Sets × Reps | Load | Rest Between Sets |
|---|---|---|---|
| Learning (weeks 1–4) | 3 × 5 | Light — form focus | 2–3 minutes |
| Building strength | 3–4 × 5 | 75–85% effort | 3 minutes |
| Muscle growth | 3 × 8–10 | Moderate | 90 sec–2 min |
Consistent load progression — adding weight on a schedule, not randomly — is what drives long-term strength. The full framework is covered in the progressive overload guide. For how sets and reps shift based on your specific goal, how many sets and reps you need depends on what you are training for.
What Equipment Do Beginners Actually Need?
Less than most gym content suggests. Here is the honest answer for each item beginners typically ask about.
Shoes
Flat, hard-soled shoes only. Running shoes with cushioned, compressible heels shift your weight forward during the pull and make a stable hip hinge nearly impossible. Chuck Taylors, wrestling shoes, deadlift slippers, or minimalist trainers all work. Pulling in socks is also fine if your gym permits it. No special purchase is needed — just avoid cushioned running shoes.
Belt
Not needed for the first 3–6 months. A belt amplifies intra-abdominal pressure, which adds stability — but it cannot create that pressure if you have not learned to generate it yourself. Learning to brace without a belt first builds better long-term trunk strength. Once you are consistently pulling 1.5× bodyweight with solid form, a belt is worth considering.
Chalk
Optional. Chalk increases friction between your hands and the bar, reducing slippage when weights get heavy. Not a priority in the beginner phase — your grip will adapt alongside your deadlift if you are not using straps.
Straps
Not recommended for beginners. Your grip should develop in proportion to your deadlift. Using straps before grip becomes a genuine limiting factor prevents that adaptation from happening. Reserve them for high-volume sessions much later in training.
Deadlift Variations to Try Next
Once your conventional deadlift form is consistent — roughly 3–4 weeks of sessions where every rep meets the form standards above — these variations are worth adding. Each trains the same hip hinge pattern but targets different muscles or solves a specific limitation.
Trap Bar Deadlift
The most beginner-friendly variation for lifters with limited hip mobility or a longer torso. Standing inside the hex bar centers the load, allows a more upright torso, and reduces lumbar demand compared to the conventional pull. Full technique in the trap bar deadlift guide.
Dumbbell Romanian Deadlift
Starts from standing rather than the floor, keeps a fixed soft knee, and trains the hamstrings through a long range of motion without the floor-contact complexity of the conventional lift. One of the best accessory exercises for hamstring development. Full instructions in the dumbbell RDL guide.
Sumo Deadlift
A wider stance with the grip inside the knees. Reduces lumbar demand, increases quad and adductor involvement, and shortens the bar path. Best attempted once your conventional mechanics are established. The full breakdown of how the two stances compare is in the sumo vs conventional deadlift guide.
Frequently Asked Questions
Should Beginners Deadlift With a Belt?
Learning to brace without a belt first is more important than the belt itself. A belt amplifies intra-abdominal pressure, it cannot generate it. Beginners who use one before the bracing mechanics are dialled in often never develop genuine trunk stiffness, because the belt does the job for them. Once you are consistently pulling 1.5× bodyweight with solid form, a belt has a clear use case. Before that, it adds very little and masks a gap that will matter later.
Is It Normal for My Shins to Get Scraped When Deadlifting?
Some shin contact is expected — the bar should drag close to your shins throughout the pull. What is not normal is significant bruising or repeated tearing, which usually means the bar is too close before you grip it, or your hips are starting too low. Wear long socks or training pants while your technique develops and the contact naturally reduces.
Can I Deadlift Without a Barbell?
Yes. A kettlebell deadlift with the bell placed between your feet is one of the best beginner progressions — it teaches the hip hinge and a vertical pulling path with less total load and a more natural handle position. Dumbbells and resistance bands also work. Once the pattern feels consistent, moving to a barbell is a natural next step.
Why Do My Hands Hurt After Deadlifting?
New deadlifters develop calluses where the bar contacts the palm — this is normal and the discomfort fades as the skin toughens over 2–4 weeks. If the skin tears repeatedly, you are gripping too high in the palm. The bar should sit close to the fingers, not mid-palm toward the wrist. Repositioning the grip typically stops the tearing.
How Long Before I Can Deadlift My Bodyweight?
For most beginners training twice per week with consistent progressive loading, pulling 1× bodyweight typically happens within 6–12 weeks. Men targeting 1.5× bodyweight and women targeting 1.0× bodyweight can reasonably expect to reach those marks within 6–12 months, depending on starting strength, consistency, and recovery quality.
The first session matters more than most beginners expect — not because the weight is heavy, but because the habits built with an empty bar are the ones that carry forward. Get the setup right, understand the push-not-pull distinction, and add weight only when form holds. Everything else in the deadlift follows from there.
If you have an existing lower back injury, hip condition, or are returning from surgery, get clearance from a physiotherapist before loading this movement.
