
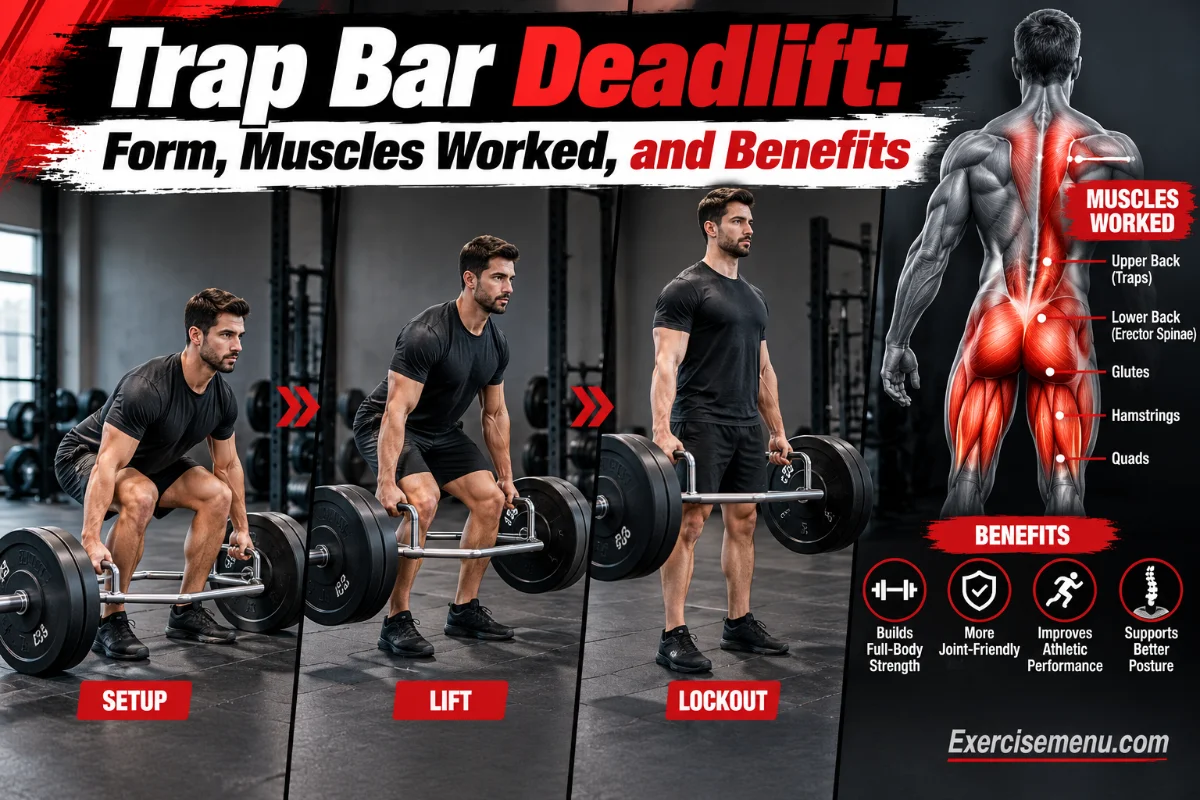
Quick Answer:The trap bar deadlift is a compound lift performed inside a hexagonal bar. It works your glutes, quads, hamstrings, upper back, and core. Because the weight sits at your sides rather than in front of you, your torso stays upright, your lower back takes less strain, and most people can pull 5–10% more than they can with a straight barbell.
The trap bar is one of the few pieces of equipment that actually changes a lift’s mechanics rather than just its difficulty. When you step inside the frame instead of gripping a bar in front of your shins, the load aligns with your body’s center of gravity, your knees can travel forward naturally, and your torso stays more upright without forcing it. The pull becomes more legs, less leverage.
For beginners, that makes the learning curve shorter. For experienced lifters, it means access to heavier loads with less spinal demand, useful as a primary strength exercise or as an accessory to conventional pulling.
What Is the Trap Bar Deadlift?
The trap bar deadlift is a deadlift variation using a hexagonal bar, also called a hex bar — that you stand inside rather than behind. The handles sit at your sides, which shifts the weight’s center of gravity in line with your body instead of in front of it.
That change produces a more upright torso, more knee flexion at setup, and reduced shear force on the lumbar spine compared to a straight barbell. Most trap bars offer two handle heights: high handles (raised 3–4 inches above the floor) for a shorter range of motion, and low handles (level with a standard 45lb plate) for the full range.
The bar was invented by powerlifter Al Gerard in the mid-1980s after a lower back injury made conventional deadlifting unsustainable. He wanted a way to keep pulling heavy without the bar forcing his torso into a compromised position. The design spread through the lifting community and is now standard equipment in most commercial gyms.
How to Do the Trap Bar Deadlift
Setup
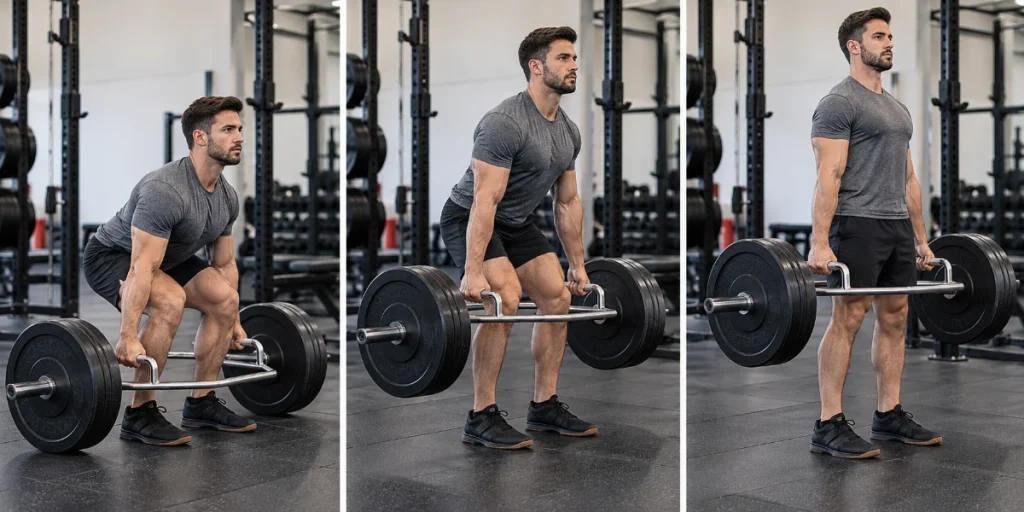
1. Position your feet. Step inside the trap bar with feet hip-width apart, toes angled slightly outward. Your midfoot should line up with the center of the handles — not the edges of the bar. Being even slightly off-center causes the bar to tilt when you pull.
2. Choose your handle height. Use high handles if you’re new to the lift, have limited hip mobility, or are taller than average. Low handles increase range of motion but demand more from your hips and hamstrings — more on how to know when to progress below.
3. Hinge and grip. Push your hips back, bend your knees, and lower yourself to the handles. Grip the exact center of each handle with a full grip — thumb wrapped around, no false grip. Here’s a simple check: lightly tug the bar before you pull. If it rolls toward you, your feet are too far back. If it rolls away, too far forward. When it lifts straight up with no tipping, your position is right.
4. Set your back. Chest up, spine neutral. Pull your shoulder blades down and back — think about tucking them into your back pockets. At the same time, press your upper arms in toward your ribcage as if you’re squeezing oranges in your armpits. You should feel your upper back and lats load.
5. Brace and pull the slack out. Breathe deep into your belly and brace your core hard. Before you pull, apply light upward tension on the bar without lifting it. You’ll feel resistance build through your legs, hips, and back — that’s the slack coming out. Only then do you drive. Skipping this step is how the bar jerks off the floor and the lower back absorbs the load spike.
Beginner tip: If your gym doesn’t have 45lb plates loaded, use bumper plates of the same diameter. Smaller iron plates drop the bar closer to the floor and increase the range of motion beyond what you’re ready for in your first sessions.
The Pull
6. Push the floor away. Drive through both heels and midfoot. Think “push the floor down” — not “pull the bar up.” The cue shifts the work into your legs. Your hips and shoulders must rise at exactly the same rate. If your hips shoot up while your shoulders lag, you’ve lost leg drive and the lower back takes over.
7. Keep the bar path vertical and your arms straight. The bar should travel straight up from start to finish. Bent arms under a heavy load shift stress onto the biceps and elbow joint, keep them locked out and let the larger muscles do the work.
8. Finish at lockout. As the bar passes your knees, drive your hips forward and stand tall. Squeeze your glutes to finish the extension. At the top: hips and knees locked, shoulders back, standing straight. Do not lean backward or shrug at the top, full hip extension is the lockout, nothing more.
The Descent
9. Lower with control. Push your hips back first, then bend your knees to lower the bar in the same path it came up. Keep your core braced the entire way down. One to two seconds is the right pace, not a drop, not a slow eccentric grind.
10. Dead stop between reps. Let the bar settle on the floor. Release tension, reset your brace and position, then pull again. Touch-and-go reps use the bounce for momentum and let positioning slip across a set. For most people, especially beginners — dead stop gives cleaner reps and builds more usable strength.
High Handles vs. Low Handles: Which Should You Use?
Most trap bars flip to offer two handle heights, and which one you use affects both the difficulty of the lift and what you get from it.
High handles reduce the range of motion by 3–4 inches. They let your hips sit slightly higher at setup, demand less hip mobility, and are easier to set up from with a neutral spine. Most people are also a bit stronger from high handles — which, for beginners, means more productive training while technique is being built.
Low handles match the bar height of a standard barbell loaded with 45lb plates. They increase range of motion, demand more from hip mobility and hamstring flexibility, and bring the lift closer to a conventional deadlift in feel and mechanics. The quad and hamstring demands also increase at the bottom of the range.
When to move from high to low: When you can consistently complete 3 sets of 5 reps from the high handle position with a flat spine, controlled descent, no technique breakdown, and moderate loading, that’s the signal. It’s not about time spent. It’s about whether your form holds under the increased range of motion. If your lower back rounds at the bottom of a low-handle rep, go back up and build more hip mobility first.
What Muscles Does the Trap Bar Deadlift Work?
Primary Muscles
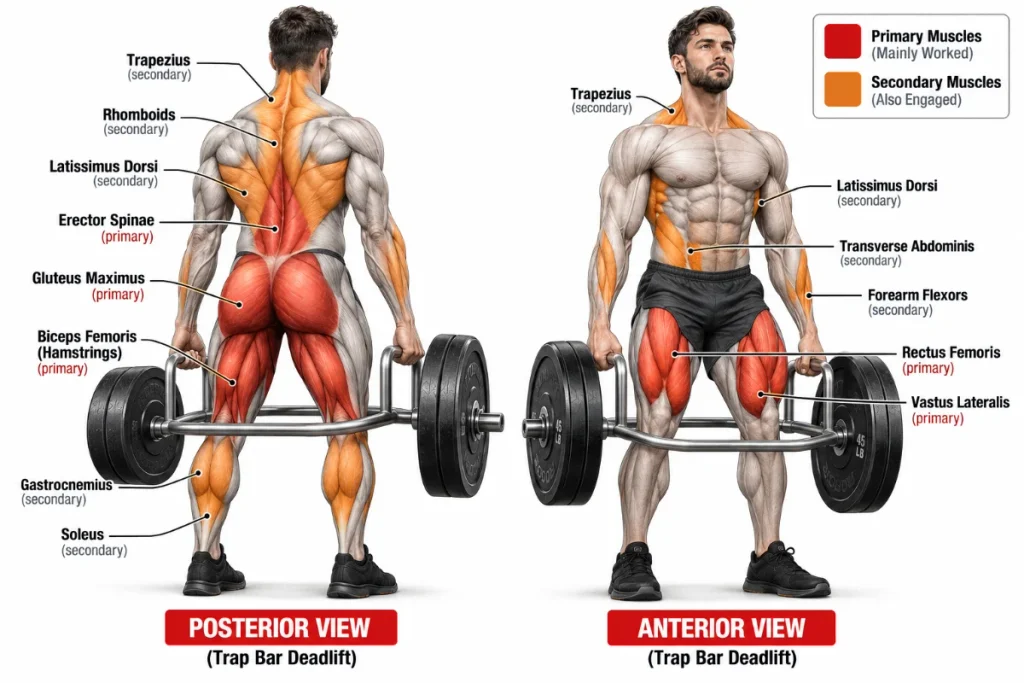
Glutes (gluteus maximus) — The main driver of hip extension. They engage as soon as the bar breaks the floor and fire hardest at lockout when the hips push through to full extension. If you’re not feeling your glutes at the top, you’re not locking out fully.
Quadriceps (vastus lateralis, rectus femoris, vastus medialis) — The trap bar allows your knees to track forward without a bar in the way, so you set up with more knee flexion than a conventional deadlift. That increases quad demand across the entire pull. A 2016 EMG study by Camara et al., published in the Journal of Strength and Conditioning Research, found significantly greater vastus lateralis activation with the hex bar compared to a straight barbell.
Hamstrings (biceps femoris) — Active throughout, especially during the initial pull and the controlled descent. The same Camara study found greater biceps femoris activation with the straight barbell during the concentric phase. The trap bar’s more upright setup reduces the hip hinge depth, which reduces peak hamstring stretch — and with it, peak hamstring demand.
Erector spinae (lower back) — Work isometrically throughout the lift to hold the spine in neutral. Research by Swinton et al. (2011), in the JSCR, found significantly lower peak moment at the lumbar spine and hip with the hexagonal bar — confirming that the erectors are loaded less here than in a conventional deadlift, which is why this variation is often recommended for people managing lower back sensitivity.
Secondary Muscles
Trapezius and rhomboids (upper back) — Hold your shoulders in position against the load. With the more upright torso of the trap bar pull, the upper and mid-traps actually work harder than in a conventional deadlift, where the torso is more horizontal and the load is distributed differently.
Latissimus dorsi — Stabilize the shoulder girdle and help maintain the bar’s vertical path throughout the pull.
Core (transverse abdominis, obliques) — Brace against spinal flexion for the full duration of every rep. The brace you create in step 5 is what keeps this activation meaningful. A loose core is how lower back strain happens regardless of bar type.
Calves (gastrocnemius, soleus) — Work as dynamic stabilizers throughout the pull, keeping you grounded through your feet and contributing to the knee extension chain as you drive the bar up.
Forearms and grip — Hold the load for the duration of the set. The neutral grip (palms facing each other) is easier on the wrists and elbows than the mixed grip often used with a straight barbell — and it eliminates the asymmetric shoulder rotation that a mixed grip creates, reducing the risk of muscular imbalances over time.
Muscle Summary
| Muscle | Role | Activation vs. Conventional DL |
|---|---|---|
| Glutes | Primary mover — hip extension | Similar |
| Quadriceps | Knee extension, floor drive | Higher |
| Hamstrings | Hip extension, eccentric control | Lower |
| Erector spinae | Spinal stabilization | Lower |
| Trapezius / rhomboids | Shoulder stability | Higher |
| Lats | Shoulder girdle stabilization | Similar |
| Core | Trunk bracing | Higher (upright torso) |
| Calves | Dynamic stabilization | Similar |
| Forearms | Grip | Similar |
Why Do the Trap Bar Deadlift?
Lower Back Demand Is Reduced
The bar’s position at your sides rather than in front shortens the moment arm at the lumbar spine. Swinton et al. (2011) confirmed this biomechanically: the hex bar produced significantly lower peak moments at both the lumbar spine and hip compared to a straight barbell at the same loads. For anyone training around lower back discomfort, this is a structural advantage — not just a subjective one.
Quads Get More Work
Every deadlift trains the posterior chain. The trap bar also loads the quads heavily, which is unique among pulling movements. The deeper knee flexion at setup creates greater knee extension demand throughout the pull. If you want to build quad strength without adding another squat variation, the trap bar pull is the most direct route in the deadlift family.
You Can Pull Heavier
Most people can lift 5–10% more with a trap bar at low handles compared to a straight barbell at equivalent effort levels — a finding supported by multiple studies including Swinton et al. (2011). With high handles, the gap widens further. More load with comparable technique demand creates more stimulus for strength and muscle development, particularly for beginners who haven’t built the conventional deadlift mechanics needed to pull close to their true ceiling. Applying progressive overload consistently to this lift is straightforward — the movement pattern stays stable, and you add load or reps over time.
Greater Power Output
Lake et al. (2017), in Sports, found that at 90% of 1RM, the trap bar produced significantly greater mean force, peak velocity, and total power output compared to the straight barbell. That makes this lift valuable beyond pure strength training — it’s a power development tool, and it’s why athletic programs from NFL to rugby include it routinely.
It Builds Real Muscle Over Time
An 8-week randomized controlled trial by Hagerupsen et al. (2024), published in BMC Sports Science, Medicine and Rehabilitation, found that twice-weekly heavy trap bar deadlift training produced significant improvements in lower body strength, power performance, and leg lean mass in recreationally active women — results that matched those of barbell half squat training. If the trap bar is your primary lower body pulling movement, the research backs its effectiveness for building both strength and size.
Neutral Grip Protects Your Shoulders and Elbows
The neutral grip of the trap bar means both palms face each other — unlike the mixed grip (one overhand, one underhand) often used for heavy conventional deadlifts. Mixed grip creates asymmetric shoulder rotation under load across hundreds of reps over months. The neutral grip eliminates that asymmetry. It also removes the supinated forearm position that puts the biceps tendon at risk under very heavy loads — a genuine concern that experienced lifters sometimes learn the hard way.
No Hyperextension Risk at Lockout
With a straight barbell, the finish position sometimes pulls lifters into a lean-back to “complete” the lift. The trap bar’s geometry doesn’t create that pull — a clean, neutral lockout is easier to achieve and maintain naturally.
What Mistakes Should You Avoid?
Rounding the Lower Back
The most common mistake and the one that carries real injury risk. A rounded lumbar spine under load is not a “tight back” — it’s the spine in a compromised position. Get flat before the bar moves. If you can’t maintain neutral through the rep, the weight is too heavy. Drop it, fix the position, build back up.
Hips Rising Before the Chest
When the hips shoot up at the start of the pull, the torso goes horizontal and the lower back takes on the work the legs were supposed to do. Fix: think “push the floor away” and keep equal pressure through the whole foot. If it keeps happening, your starting hip position is probably too low — you’re treating the deadlift like a squat rather than a hinge.
Off-Center Grip
Gripping toward one end of the handle tips the bar under load and creates asymmetric loading through your back and hips. Use the tug test described in the setup — and grip the midpoint of each handle, not just roughly in the middle.
Skipping the Slack Pull
Yanking the bar from a slack state sends a sudden force spike through your lower back in the first inch of the lift. Three seconds of pulling slack before you drive isn’t slow — it’s what separates a controlled pull from a jerk.
Knees Caving Inward
Particularly common as weights increase. Drive your knees out in line with your toes from the first inch of the pull through lockout. Think “spread the floor” with your feet — this activates the hip abductors that prevent knee valgus collapse.
Head in Hyperextension
Many lifters look up at the ceiling during the lift, thinking the visual cue will help them stand. It also puts the cervical spine into full extension under load — unnecessary strain on the neck muscles and upper vertebrae. Pick a point on the floor 6–7 feet ahead and look there. Your head stays neutral without thinking about it.
How Can You Progress the Trap Bar Deadlift?
Once the standard movement is solid, these variations extend what the trap bar can train.
Deficit Trap Bar Deadlift — Stand on a weight plate or low platform inside the bar. This extends the range of motion below standard floor height, increasing quad and hip demand at the bottom of the pull and building strength off the floor. It also works as a natural progression between high and low handles. Use it only once your standard low-handle form is clean.
Jumping Trap Bar Deadlift — At 20–30% of your 1RM, perform the pull explosively and allow your heels to come off the floor at the top. This trains peak power output and rate of force development with direct carryover to sprint and jump performance. Load is irrelevant here — speed is the goal.
Tempo Trap Bar Deadlift — Slow the descent to 3–4 seconds per rep. Increases time under tension, exposes weak points in the range of motion, and builds positional strength without adding load. Useful when your technique breaks down under fatigue rather than under weight.
Low Handles (from high handles) — The most common progression. Increases range of motion and moves the lift closer to conventional deadlift mechanics. Earns its place once your high-handle form is genuinely solid.
How to Program the Trap Bar Deadlift
| Goal | Sets × Reps | Load | Rest |
|---|---|---|---|
| Strength | 4–5 × 3–5 | 80–90% 1RM | 3–4 min |
| Muscle growth | 3–4 × 6–10 | 65–80% 1RM | 90 sec–2 min |
| Power / athletic | 4–6 × 3–5 (explosive intent) | 70–85% 1RM | 2–3 min |
| Beginner | 3 × 5–8 | Light — form focus | 2 min |
Place the trap bar deadlift first in your session. Your central nervous system and legs are freshest at the start, and this lift demands both. Train it once or twice a week — heavy pulling is CNS-intensive, and frequency beyond that outpaces recovery for most people. Matching your sets and reps to your goal matters as much as the exercise itself — see how many reps and sets to use for your goal.
FAQ
Does the trap bar deadlift build the same muscle as a conventional deadlift?
Mostly yes, with two meaningful differences. Quads are more involved in the trap bar pull due to the deeper knee bend at setup. Hamstrings and erector spinae are slightly less loaded because the more upright torso reduces the hip hinge depth. For overall lower body and back development, either works. If quad strength is a specific priority, the trap bar has an edge.
Can I build serious muscle with only a trap bar?
Yes. Hagerupsen et al. (2024) found that 8 weeks of twice-weekly heavy trap bar training produced significant increases in lower body lean mass in recreational female lifters — results comparable to barbell half squat training. Heavy, progressive trap bar work builds muscle in your glutes, quads, hamstrings, and upper back over time.
How much does a trap bar weigh?
Standard closed trap bars typically weigh 45–60 lbs (20–27 kg). Open trap bars usually run 55–70 lbs. Olympic trap bars range from 55–77 lbs. The bar at your gym may weigh meaningfully more or less than a standard 45lb barbell — always check before calculating your total. See hex bar weight by brand and model for a full breakdown.
Should I use straps for trap bar deadlifts?
Not for most sets. Grip should develop alongside the lift. Reserve straps for your heaviest working sets or high-volume sessions where your grip is genuinely the limiting factor — not as a default setup. The neutral grip of the trap bar is already easier to hold than a barbell’s overhand or mixed grip, so grip usually holds up longer here.
Is the trap bar deadlift safe during pregnancy or for older adults?
The trap bar deadlift is often used in modified strength programs for both populations because of its upright torso position and lower lumbar demand. However, exercise selection during pregnancy or with age-related health considerations requires clearance from a doctor or physiotherapist. The movement mechanics are relatively forgiving, but “forgiving” is not the same as universally appropriate.
If you have an existing lower back injury, joint condition, or are returning from injury, check with a physiotherapist before loading any deadlift variation.
